User management and authentication service using MongoDB
More often than not, web applications require restrictions regarding who can access the content that they serve. This involves an user management and authentication system, which, if designed inappropriately, can lead to security concerns. However, the development of such system can be time consuming, especially if done repeatedly for multiple applications.
To solve this problem, this article presents a user management and authentication service, built around MongoDB, that can be easily plugged into an existing application with only minimal refactoring.
Additionally, this article introduces middleware for Express and Vue that facilitate the integration of the service into existing applications.
An example application
Let’s imagine a simple Express application which serves Sensitive data upon receiving an HTTP GET requests on the /data endpoint:
const express = require('express')
const cors = require('cors')const app = express()
const port =  7070

app.use(cors())app.get('/data', (req, res) => res.send(`Sensitive data`))app.listen(port, () => console.log(`App listening on :${port}`))
As an example front-end, we’ll use a simple Vue application which uses vue-axios to retrieve the aforementioned data from the back-end:
<template>
  <div>
    <h1>My app</h1>
    <p>{{message}}</p>
  </div>
</template><script>
export default {
  name: 'App',
  data: () => ({ message: 'Loading...' }),
  mounted(){
    this.get_data()
  },
  methods: {
    get_data(){
      this.axios.get('http://YOUR_SERVER_IP:7070/data')
      .then( ({data}) => { this.message = data } )
      .catch( error => { this.message = error } )
    }
  },
}
</script>
With such a simple setup, it comes to no surprise that our front-end application is able to display the back-end’s Sensitive data whether the user is authenticated or not:
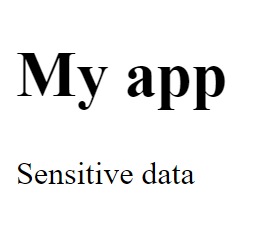
Without any authentication mechanism, the front-end can freely retrieve the back-end’s sensitive data
Here, one way to implement access restrictions would be to build an authentication system from the ground up, but having to do so for every application would be tedious. Instead, we’ll deploy our pluggable authentication system to handle the task.
The user management and authentication service
The user management and authentication service comes in four parts:
- A MongoDB database to store users
- The user management service itself, which interacts with the database
- A GUI for the service to interact with the server-side application
- A reverse proxy to appropriately tie the GUI and the back-end together
All three are packaged as docker containers and can thus be easily deployed using the following docker-compose.yml file:
version: "3.7"services:
  mongo:
    image: mongo
    logging:
      driver: noneuser-manager-api:
    image: moreillon/user-manager-mongoose
    environment:
      MONGODB_URL: mongodb://mongo
      JWT_SECRET: keyboard_cat
    ports:
      - "7071:80"user-manager-front:
    image: moreillon/user-manager-mongoose-front
    logging:
      driver: none
    environment:
      VUE_APP_USER_MANAGER_API_URL: /proxy/apiuser-manager-front-proxy:
    image: moreillon/api-proxy
    environment:
      PROXY_API: http://user-manager-api
      PROXY_ROOT: http://user-manager-front
    ports:
      - "8081:80"
Note the JWT_SECRET environment variable that users will want to set to a secret of their choice. Also, the MONGODB_URL environment variable can be changed so as to use another MongoDB instance.
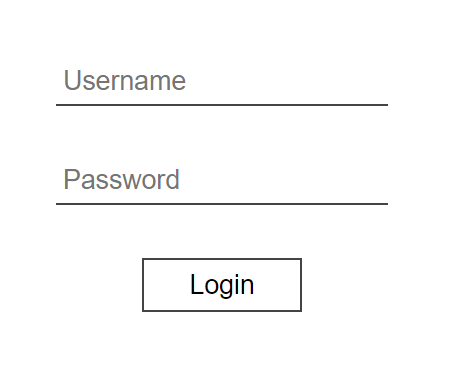
After deployment using the docker-compose up command, the service should be deployed. Its back-end API is available on port 7071 while pointing your browser to port 8081 of your server should present you with the following login screen:
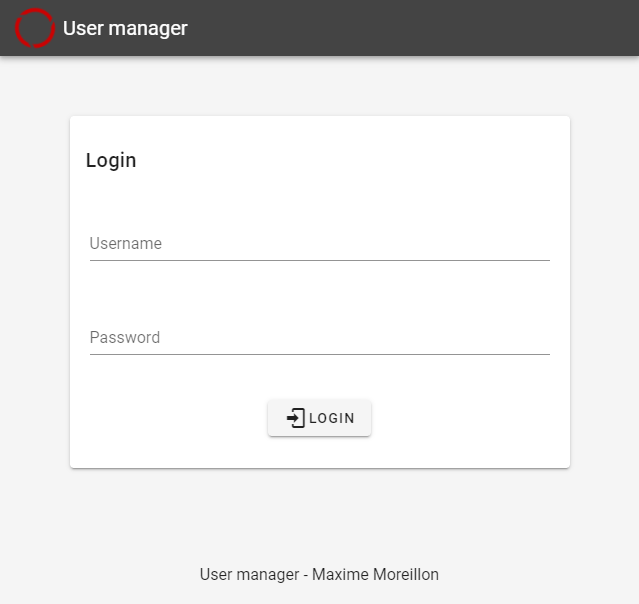
The login screen of the user management service
Although modifiable via environment variables, the default username and password are both admin.
A successful login will allow access to the user list, which would originally only contain only the admin user:

The user list view of the user management service
More often than not, content is to be serves to multiple users. Accounts for those users can be created using the corresponding button. In this example, we’ll create the user roger.
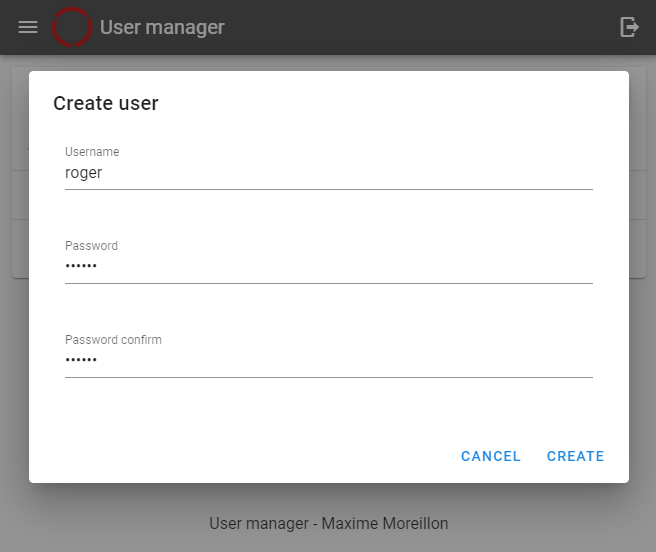
Creation of the user roger
Creating a user only requires a username and a password. Once created, the user appears in the user list.
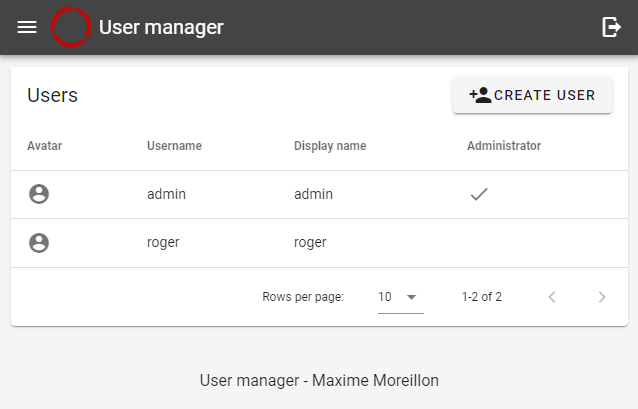
The newly created user (roger) appearing in the user list
Further configuration of a user can be done by clicking on the corresponding row of the user table. Options include granting administrator rights which provides the user with the ability to create and delete users.
Integration with the existing application
Now that the user management service is deployed, our example application needs to be updated so as to use the former for authentication. This involves connecting the both the back-end and the front end of our example application to the user management service’s server-side application.
Back-end integration
We will start with the back-end integration. Here the objective is to prevent unauthenticated usersfrom accessing retriving data from the /data endpoint. For Express applications, a dedicated module has been developed and can be installed via NPM:
npm install @moreillon/express_identification_middleware
Once downloaded, our back-end code can be refactored so as to use the module as an express middleware:
const express = require('express')
const cors = require('cors')
const auth = require('@moreillon/express_identification_middleware')const app = express()
const port =  7070const auth_options = {url: 'http://YOUR_SERVER_IP:7071'}app.use(cors())
app.use(auth(auth_options))app.listen(port, () => console.log(`App listening on :${port}`) )
Note here that the middleware takes the url of the user management service as parameter. Technical details about this package are omitted for the sake of brevity.
With this done, the front-end should no longer be able to display the Sensitive data from the /data endpoint and return a 403 (forbidden) error code instead:
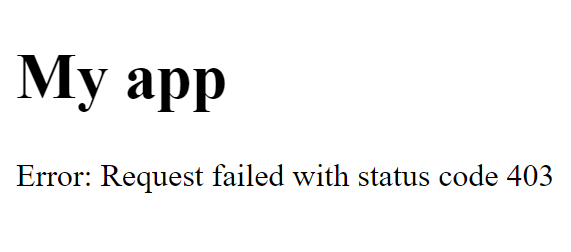
The front-end after authentication has been implemented in the back-end
Front-end integration
Now that the data is restricted to authenticated users on the back-end, it is time to provide our front-end with means of authenticating users.
Here again, a dedicated front-end module has been developed for this purpose. It can be installed using NPM as follows:
npm install @moreillon/vue_authentication_wall
This package provides the AuthenticationWall component, which, as it names suggests, places itself between unauthenticated users and the application content. Here again, technical details about the package are omitted. The usage of the component is fairly straightforward. It wraps the application content as such:
<template>
  <AuthenticationWall
    :options="wall_options"
    @user="get_data()">    <div>
      <h1>My app</h1>
      <p>{{message}}</p>
    </div>  </AuthenticationWall>
</template><script>
import AuthenticationWall from '@moreillon/vue_authentication_wall_vuetify'export default {
  name: 'App',
  components: { AuthenticationWall },
  data(){
    return {
      message: "",
      options: {
        login_url: 'http://YOUR_SERVER_IP:7071/auth/login',
        identification_url: 'http://YOUR_SERVER_IP:7071/users/self',
      }
    }
  },
  mounted(){
    // get_data() call moved to @user event of AuthenticationWall
  },
  methods: {
    get_data(){
      this.axios.get('http://YOUR_SERVER_IP:7070/data')
      .then( ({data}) => { this.message = data } )
      .catch( error => { this.message = error } )
    }
  },
}
</script>
Note how the AuthenticationWall needs to be made aware of the user management service’s API URL for login and authentication. This is done using the options prop.
Also, the call of get_data() has been moved from mounted() to a custom event emitted by the authentication module, which allows the API call to be delayed until the user is properly authenticated.
With the authentication module installed, clients accessing the front-end should be presented with the following login page:
The login interface of the authentication module
Here, one can log in using any user account listed in the user management service, such as the roger user previously created. Upon successful login, the back-end data is finally visible to the user.
The back-end data visible to clients after successful login
Conclusion
With the user management service and integration modules presented in this article, authentication can be easily implemented in existing applications, which allows developers to focus their time and energy on the actual content of their project.
A working example of the service presented in this article is available on GitHub here.
Links and references
This article has also been posted to Medium